Thursday, August 2, 2012

Crab Handprints with Rubbing

These are just TOO darling for our OCEAN theme.

Yes, he wanted a sad crab with a frowny face.

The one I saw had colored paper for the background, which I'm pretty sure wasn't cut by the child, losing a whole host of process art experiences. So, as usual, I changed it up to add more learning elements to the craft.

First we folded our papers in THIRDS. Since these are two-year-olds, I didn't worry about them getting it exact and doing major comparisons. We just quickly went over the general idea of thirds and that we were going to draw sand on the bottom third and ocean and sky on the top two-thirds.


For older children, I would have them be a little more precise in folding their thirds, and color the bottom tan, the middle a darker blue for the ocean and the top third a light blue for the sky.


Then they each chose a piece of sandpaper to put under the 1/3 side of their papers to start rubbing over.


This is a HARD concept for this age. So, we do it every couple of weeks. It's good to keep them on their toes, and realizing that rules can be situational, especially when it comes to art.


"In this case, for these reasons, we do it this way this time."
  • Yes, we usually hold our crayons upright, but not this time. This time we lay them down and push them over the paper. [This is not something they see adults do.]
  • Yes, we are not supposed to take the papers off the crayons, but this time we will. We have to have the papers off the crayons to use their sides rather than their tips.

When done with the tan third, we opened them up and draped the tan side over the edge of the table. For the blue side, we didn't use the sand paper underneath.


Once done with the rubbing, the children chose the color of their crabs and we painted their hands for making the hand prints. It helped to turn the paper to align with the child's hand. Sounds simple, but they wanted to have their papers directly in front of them and turn their hands sideways. They really couldn't get the right angle that way, so I had to convince them to let me turn their papers instead.


G chose a traditional red crab. The girls chose purple crabs. I assured them there really are bright purple crabs. Once the paint had dried, we added some google eyes. The children had to find two SMALL eyes that were the SAME size.


Then they were instructed to draw a yellow circle in the sky for the sun and color it in, if they so chose. They did. These are concepts we are just starting, drawing shapes and coloring in. I liked the opportunity to keep the skill request small and easy and relevant to the project. They did a VERY good job.


They each chose a cotton ball and pulled it part. After deciding where their cloud would be, they laid down glue, 


and carefully placed their cotton fluffs upon it.


They chose what they wanted for the mouth among the craft supplies. H chose a gold braid, and G chose a purple yarn. 

A left early. It's Friday. 

We really work on proper scissor hold from the time they begin teacher-assist cutting around 18 months. This hold is the PERFECT one for preschoolers. The index finger pointing out gives them much greater control over their line.


Thumb up! Scissors steady! Move your paper! 
[or whatever you're cutting]


They had to decided if they wanted a happy or sad crab. H didn't have much choice, because the gold braid wouldn't form on just glue. 

Again with the glue. They LOVE to glue.


Then they carefully placed and held down their mouth pieces for a few.
Fini!


This is a great piece to work on positional statments, so we did.
  • What is the crab ON?   [beach/sand]
  • What is BEHIND the crab?   [ocean, sky]
  • What is ON the crab?   [eyes, mouth, legs]
  • What is UP in the sky? or What is IN the sky?   [cloud, sun]
  • What is DOWN on the beach?   [crab, shells]
  • What could be IN the ocean?   [open discussion]
  • What is UNDER the cloud?   [crab]
  • What is NEXT TO the sun?   [cloud]

I wish I would have bought the shell hanging that I saw at the Salvation Army the last time I was there. I just thought it was too big to store for this theme. I didn't think about taking it apart for the little shells. If it's there the next time I go, I'll grab it so we have some little shells to use as accents on projects like this one. Unfortunately, I only had big ones on hand.


I got this idea off Pinterest via Daily Dose of Sugar Mama, who no longer has her original link id for the site she got it from.


SKILLS

Art: artistic expression, rubbing, painting, printing, cut, paste, drawing, mixed media, colors
Math: counting eyes and legs, thirds, top/bottom, big/small, same/different, up/down, on/off rectangle, circle
Science: crab anatomy, habitat, sky/ocean/beach discussion
Social: waiting turns, sharing resources, requesting peer assistance
Fine Motor: drawing, painting, rubbing, cut, paste, picking out google eyes, pulling cotton, placing items
Tags: ocean, sea, beach, crab, animals, habitat, science, theme, unit, craft, art, painting, rubbing, preschool, child care, childcare, daycare, kindergarten, handprinthomeschool, handprint

Wednesday, July 25, 2012

3D Fish from 2L Bottle


These are SO COOL!

These can look VERY amazing, link at the bottom, but I like these process art ones by my 2-year-old students even better.  

A little Rainbow Fish theme today.

Don't let the length of the post and the number of instructions intimidate you. The basic fish goes together in just a few minutes once you know what you're doing. I had to figure out a bunch of stuff, so I wanted to make sure my instructions were detailed. 

First off, you have to pick the right bottle. 


ONLY the one on the left will work.

The shaft of the bottle must be smooth with no contour.

Lesson learned the hard way trying make one of the other ones work. It didn't. Ever.


Using a utility or snap blade knife, cut off the bottom just at the top of the ridges.


Add the bottom to your painting supplies for flower or sand dollar stamping or use to freeze large ice cubes in the shape of flowers for a punch bowl. I do both. With the same ones. Depending on the need at the time.


Flatten and staple. Important...press down firmly and ensure that the staples staple properly.

A double stapling in the middle is best and more secure, since you will be popping the plastic in and out around them.


Cut top and bottom at an angle to create the fins.
[If you are not the visual/creative type, I've created a template for this part.]

 
 Cut the bottom curvy for a tail.


Cut a curve up to toward the staples, staying back about 1 inch to finish the tail, and from there curve down to the top edge of the fin to create the body.


From the top it looks like this.


Pop the plastic back out to 3D.


Hold it up and see about where it centers for hanging level. Using a hole punch, add holes to either side of the fish for hanging. It's much easier to do at this stage than later.


For the scales, I found it easiest to use crepe paper streamer. I flattened a TP tube, folded it in half, and used it to wrap the crepe paper around.


 It was very easy to just pull it off when I had as much on there as I wanted.

 Snip both folded edges...

 and round off one end.


Make sure to supply just a few scales of the same size and shape made out of FOIL for a Rainbow Fish effect.


The children got to pick the colors of the scales we used. I created them and placed them in the center of the table for them to freely pick from.


I gave them some watered down school glue in cups and they picked a big brush and went at placing the scales on their "fish" decoupage style.


These were 2-3 year olds, so the nicely layered, overlapping scales that an older child might achieve were not apparent. I was surprised at their diligence in getting their entire fish covered. It was a lot of work for little ones, and I didn't have one pre-made to encourage them with. Once covered, I re-defined the edges with scissors. 


And re-opened the hanging holes.


To make the eyes, we traced around a bottle cap, cut it out, teacher-assisted as needed, and glued it on. The children then got to pick circles out of the foam shapes to add on top.


The mouth is created from condiment cups. We snagged these during a BK run over the weekend. Arby's, Wendy's and other restaurants have them, as well as hospitals, doctor's and dentist offices, usually. 


I found it impossible to cut the mouth off the bottle using either scissors or my snap knife. I ended up using my serrated bread knife and cutting just at the base of the top, a little over a 1/2 inch below the bottom ridge of the top.

 I found that I needed to turn it and do each quarter edge separately in order to keep it even across the top. Once I get the top off, I can refine the hole as needed with scissors to make it big enough for the condiment cup to fit into. 

Don't worry about the edges of the hole being perfect. The condiment cup has a lip that covers up any imperfections, and it will form to the shape you create, so even a perfect circle isn't necessary. Just try not to get it too big. 

Now that I know what I'm doing, I'm doing this step in the first stages when I initially cut and form the fish. 


The children chose the color of paint and painted the inside and outer rim of their cups.

I didn't GLUE the cups into the mouth openings. These children are young enough that they routinely flatten their fish, and I have to get in there and pop the plastic out. It's easier to do if I can get the cup out and go in through the mouth. If they lose their mouths, those are easily replaced.


 We added them to our under the sea scene in our classroom.


This is an original idea from Filth Wizardry that I found via Pinterest. I felt that their instructions left much to be desired, and think my stapling technique is superior to their taping technique for overall stability and design, but the fish she created herself are AMAZING! Check them out to see just how beautiful these creations can be. A very unique, creative idea that I can't thank Filth Wizardry enough for sharing!
 Tags: pop, soda, bottle, fish, ocean, sea, theme, unit, preschool, kindergarten, daycare, childcare, child, care, cut, paste, glue, mod podge, decoupage, 3D, 2-liter, scene, decoration, party 

Ocean Sensory Bin


Sensory is always a key element for any theme, but the ocean, sea, beach, and luau themes are always a little bit special.  


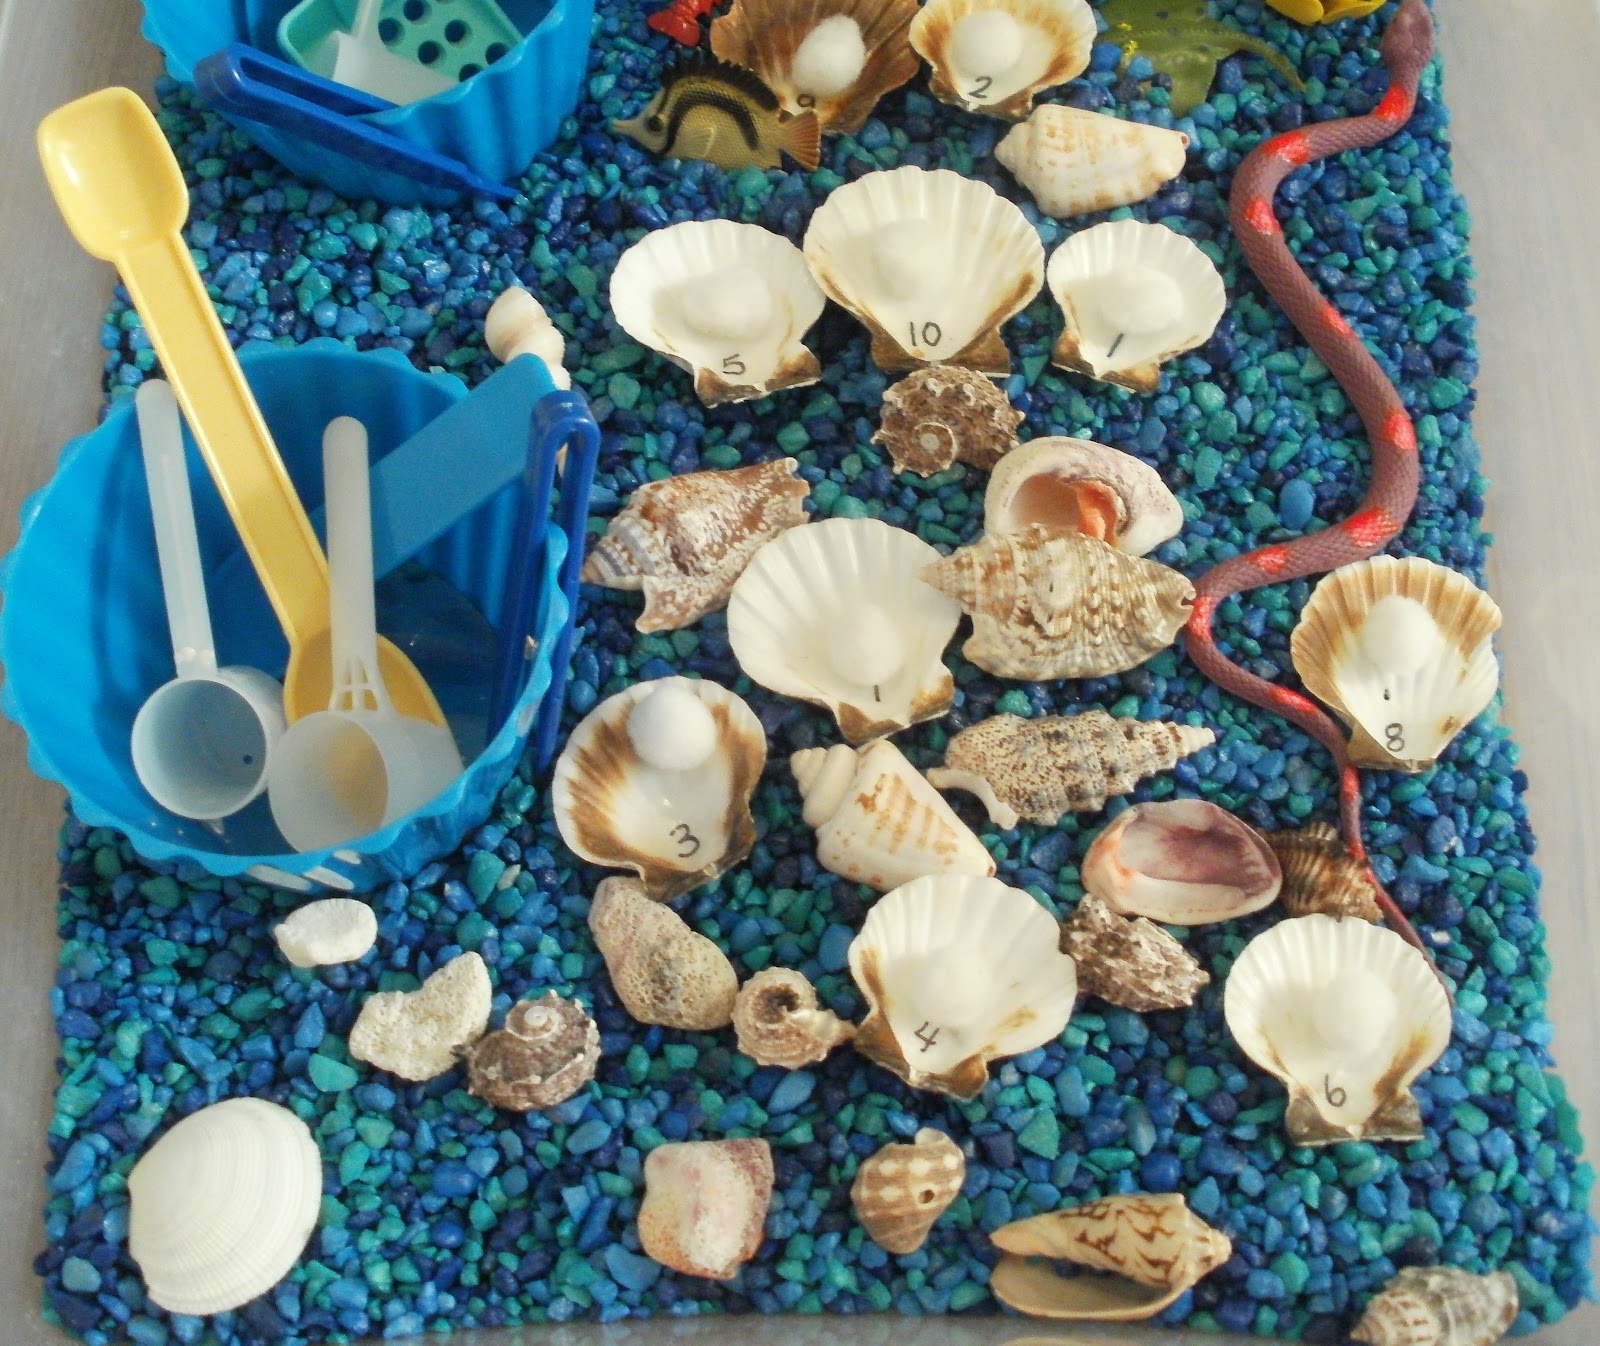
The children get to explore the large conch shell, shells, coral, starfish, shark teeth, and other items they just normally wouldn't come across here in the center of the U.S., basically as far away from an ocean as you can get. These are all items that I have purchased or collected from various beaches over the years.


For this year's OCEAN/SEA theme, I created this sensory bin. I use an underbed storage bin, which is large enough for 4 children to play simultaneously without space or resource issues.


The base is 20 pounds of aquarium gravel at a cost of $15. It is too much. It is HEAVY! 10 pounds would have been enough to cover 1/2 and I could have had the other 1/2 sand. I would have done that anyway and just only put in 1/2 the bag, but I didn't have any sterilized sand on hand, which I normally do. The combination of sand and gravel is easy, because of their size difference. The gravel is easily sifted from the sand at the end of of the theme for storage.


One end is ocean animals.

Activities:
  • Matching. I have two sets of plastic animals so that the children can match them.
  • Magnetic fishing. I have a few of our magnetic fish randomly placed and the children can catch them with the rod. These fish can also be used for letter, number, shape, color or sight word fishing games. It is also a good study in magnetism as to which ones they can catch and which ones they can't and why.
  • Sorting. Fish, coral, sea urchins, crustaceans, etc.
  • Sorting by Color.


One end is shells.

Activities:
  • Matching. I have two sets of shells so that the children can match them.
  • Pearls on the Oyster. Using the tongs, children place a white pom on each of the shells.
  • Pearls on the Oyster. Using a spoon or scoop, children place the correct amount of pearl beads onto the numbered shells.
  • Pearls on the Oyster. Using tongs, the children place the correct amount of white pony beads onto the numbered shells.
  • Shell ordering 1-10. The flat shells are numbered and children can order them 1-10 or 10-1. The shells are sized accordingly. 
  • Sorting. Long, round, spiral, tube, flat, etc.
Additional scoops, sifters, pitchers, cups, ladles, etc. are always available for sensory play.

I was surprised that the little ones immediately caught on to the matching aspect and raced each other to see how many matches they could find. They also really spent a lot of time with the tweezers moving the "sea urchin" spiky balls and "pearl" poms around.

SKILLS
Sensory: gravel, and all the items
Fine Motor: Pouring, scooping, sifting, matching, tweezers, tongs, spooning, pincer grip
Math: 1-1 correspondence, counting, number recognition, number order, matching, logic/reasoning, sizing, comparison, geometry
Art: artistic expression, composition, mixed media
Social: sharing resources, community play, dramatic interpretation, negotiation
Language: social discourse, requesting resources, negotiation, vocabulary
Science: ocean animals, ocean environment, predators, reefs, scientific discussion

Tags: sensory, math, matching, sorting, preschool, daycare, child, care, childcare, ocean, sea, beach, theme, unit, math, sensory bin, pearl, oyster, animals, fine motor, counting, numbers, science, 

Jellyfish From Trash Liners

I and the children LOVE these AMAZING trash liner jellyfish.
So simple, and yet such an amazing addition to our OCEAN/SEA theme. 

I have added a Youtube tutorial at the bottom.


 To make these I used two 10 gallon commercial trashcan liners, the ones for small office trash cans, at a cost of about 5 cents and about 10 minutes of time each.

#1 The first liner is opened up, four "corners" [just grab the edge about every 1/4 around] brought together and stapled, then stuffed down into the center of the bag to create a bowl shape.


#2 For the second liner, cut off the sealed edge.


It is accordion folded in fourths. Unfold completely and fold over once to create a square, giving you four layers of plastic.


Cut off the edges and cut into spiral. I did about a 1 - 1 1/4 inch thickness. The wider the strip the shorter the "tentacles." I didn't try to be that accurate or to make a perfect circle. I knew once they were opened out that it wouldn't matter.


You end up with a pretty long strip. I folded it in half and cut it to create two strips of equal length. Since it's actually doubled over double layers, this gives you 8 tentacles total. Spread them all apart. 


\

If you try to attach them without separating them first, they will cling to one another and not fall properly to create the tentacle effect. Once separated, join them all together, placing them randomly together in a circle and stapling together. 

Since you have two sets of four of the same cut, this is important that they not sit perfectly together or it won't look right.
  

Stick the tentacle staple up against the inside of the bowl shaped bag and push up with your hand. Collect all layers on the top, along with a string to hang if wanted, and staple. You can't see the staple on the ones I have up. The plastic folds over and hides it.

The layers are:   TENTACLES
                         TOP OF BAG gathered together and folded over 
                          [pic below]
                         BOTTOM CENTER OF BAG
                         STRING FOR HANGING

All are stapled through at once. I can now make them with just one stable through the whole thing, but it is easier to staple the tentacles first, then the top of the bag, then the combined pieces.


These are WONDERFUL!! 
I'm so glad I came across the idea.

I think my process is MUCH easier than the original instructions, which used clear rubber bands. This is an original idea of Casa Haus English that her daughter created for a school assignment. She placed her jellyfish creation on a stick and used it as a movable puppet. Our jellyfish did the same, which is really cool, but with 2 and 3-year-olds, playing with plastic bags just doesn't work. So, ours are hung from the ceiling.


TUTORIAL

I have received several emails about the bringing the "corners" together step, so have created the following tutorial. 

A couple of things to note is that for this one I used smaller liners than the ones in this post, and I folded the first liner in quarters rather than opening it out and folding it in half, so the tentacles came out shorter.

Only the last staple is necessary. If you are making a lot of these, you'll probably get to the point where you can just hold it all together and only use the one staple.


Tags: ocean, sea, theme, unit, preschool, kindergarten, child, care, childcare, daycare, beach, jellyfish, animals, craft, art, decoration, puppet, plastic, bag, trash, can, liner