Monday, July 8, 2013

Number of the Day

In previous posts I have noted how I teach early number recognition and our progression to 2-digit numbers. 

After just a few weeks of formal introduction, 2-digit numbers quickly became 3-digit numbers. So, since number RECOGNITION was no longer an issue, I felt it was time to introduce them to number REPRESENTATION. 

3 posters/journal pages at TPT $1.50

I created posters for numbers 0-10, one for 0-20, and this one for 0-100, that we are using.  

The children have had some slight introduction to ten frames and number lines prior to this. Tally marks were new. I simply said they stood for their four fingers and their crossing thumb, which they know to equal five.


We are BARELY starting skip counting, so the tally marks are more for a visual representation than a skip counting activity at this point. However, doing this every day, they are picking it up pretty quickly. 

As they get better at counting by 5s, we'll be able to step up telling time, so I am taking note of their progress in this skill for other reasons. 
Tags: math, counting, number, numbers, recognition, representation, preschool, pre-k, kindergarten, 1st, 2nd, grade, first, grade, homeschool, number line, tally marks, math journal, math center, poster, center, circle time, 

BOSS NUMBER - Addition and Subtraction

As we delve into the numerical representations of addition and subtraction, I introduced them to the concept of the BOSS NUMBER, the BIG number, who is in control, and the HELPER NUMBERS, who work together to equal the boss, and who the boss can take away.

They each chose a number after a few second introduction to BOSS and HELPER numbers.

The helpers had to join together, combine their efforts, ADD UP to equal the SAME as the BOSS number. 


1 + 2 = 3

BUT, the helpers are actually a GROUP when they combine, and either one can be first.

2 + 1 = 3


The BOSS number can decide to TAKE AWAY a HELPER number, and leave the other number behind.

This BOSS chose to take away, SUBTRACT, the number 1 from the HELPER GROUP, leaving 2 behind.


3 - 1 = 2


The number 1 was not so happy at being left behind when the BOSS number chose HELPER number 2 to SUBTRACT the next time.


This is a little different, concept-wise from how I was taught to think about addition and subtraction. My learning was much more an ephemeral idea of adding in and subtracting out numbers. This presents it more as specific movements within a closed set of units, a constant, not transitory, operation. 

As the little girls were stating on the playground today, 
with conviction,
"1+2=3, 2+1=3, and 3=3." 
Always. 


As we work with equalitities and inequalitites, we of course bring out our balance scale. Every possible visual and physical representation is important for their understanding. This is where worksheets just won't cut it. For true, in-depth, understanding of any language, including that of mathematics, children need immersion, context, and connection through relevance.
Tags: preschool, pre-k, first grade, 1st, grade, addition, subtraction, math, movement, play, based, learning, center, theme, unit, early

Wednesday, July 3, 2013

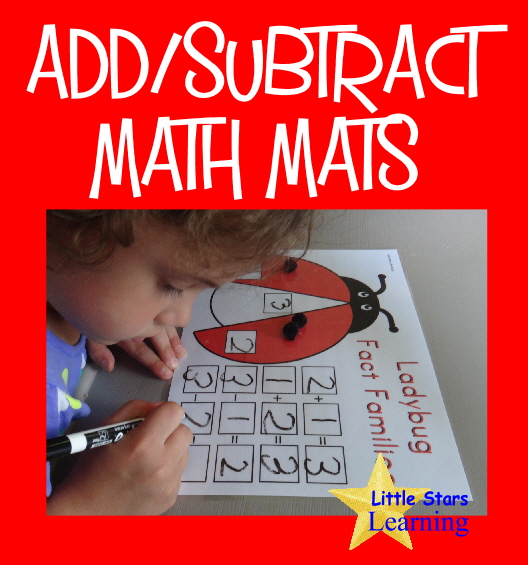
Fact Families Addition/Subtraction Mats


We may be working on addition and subtraction more formally, but that doesn't mean we abandon our philosophy of child-led learning through play. I created these math mats to provide the children with opportunities to manipulate this learning concept with a hands-on learning activity.


The children will either work on a given fact family, which we display on our bulletin board with our Fact Family of the Day poster, or use a domino, dice, or some other method for creating a fact family to work upon. Once laminated, the mats can be used with dry erase markers, dry erase crayons, play dough, etc.


Fact Family Poster and 7 Math Mats $2.00 at TPT
For each mat, the child adds something different to create an artistic, manipulative, representation of the quantity. This can be done with the dry erase markers or crayons, play dough, pom poms, string, yarn, or other manipulatives. Below you see that we used birthday candles on the Happy Birthday cupcake mat, and plastic food from the dramatic play area for the Garden mat.


Each mat is different, appealing to different interests, so that the children can choose the one that appeals to them the most. This is a free choice activity once the initial introduction has been made.


For children whose writing skills are just emerging, number cubes can be provided for them to use, or they have the option of using string, play dough, tally marks or dots to show the quantities that go in each square. You can also create number cards sized to fit.


The goal is to get them thinking about manipulation of quantities, not just learning facts. Although we are formally working on addition and subtraction, we are also still working on grouping and beginning concepts of multiplication and division through play.

Tags: addition, subtraction, fact, facts, fact families, manipulatives, math center, math, mathematics, early, beginning, hands-on, learning, play, playdoh, preschool, pre-k, kindergarten, first, second, 1st, grade, number, numbers,

Thursday, June 20, 2013

Introduction to Addition and Subtraction

Prior learning: For awhile now, we've been discussing addition and subtraction and doing simple equations through play and finger exercises. We have worked on breaking sets into groups through classification and sorting since infancy. They are also familiar with the signs involved in addition and subtraction.

Today we did a formal introduction to addition and subtraction and the related equations. 


I asked the children to pick a number between 2 and 9. They chose 3. I asked them to get a SET of three items from the play area. 


I then asked them to DIVIDE their items into two GROUPS. Ironically, they each chose items that easily split into groups of one and two, which I hadn't though about beforehand.


"When we ADD, we put two groups together. How many do you have in each GROUP?"

2 and 1

"Now...Grab your GROUPS..."
 

"And bang them together! Now they are ONE SET again. A SET of 3 made up of GROUPS of 2 and 1."


They mimicked my actions: 

Holding up my 1 white block, "ONE," holding up my set of 2 green blocks, "PLUS TWO...EQUALS...," bringing them together in front of me, "THREE!"

Separate the groups in front of me.

Holding up my 2 green blocks, "TWO," holding up my 1 white block, "PLUS ONE...EQUALS...," bringing them together in front of me, "THREE!"

"Let's write our fact family for the ADDITION of 1, 2, 3 on the white board:"

1 + 2 = 3
2 + 1 = 3

"One plus two and two plus one are the SAME and together, one and two are ALWAYS three."

"ADDING is when we put groups together. SUBTRACTING is when we take groups apart. How many do we have all together? Yes...THREE. Pick up your set of ONE."


"And...take it away...HIDE IT!"


 "THREE...take away, SUBTRACT, MINUS, one, leaves us with....YES! Two!  Three MINUS one EQUALS, leaves us with, two."


"Now let's take away, MINUS, our set of two. How many is left?...YES! One. Three MINUS two EQUALS one."

"Let's write our fact family for SUBTRACTION of 1, 2, 3 on the white board."

3 - 1 = 2
3 - 2 = 1

"This is called a fact family. It is the four equations, two addition and two subtraction, that can be made from a family of numbers." 

"Now, when I say MINUS, I want you to split your groups APART."


 "When I say ADD, I want you to put your groups TOGETHER."


We did this a few times.


Mimicking my movements: 


"Now, stand up WITHOUT your items and make fists. When I say SUBTRACT, open your arms REAL WIDE, because when we SUBTRACT, we pull sets APART...SUBTRACT!!" 

"Good. Now, when I say ADD, bring your fists together, because when we ADD, we bring sets TOGETHER...ADD!!"


I would randomly call these out during the rest of the day and the children would open and close their arms appropriately.  

Tags: math, addition, subtraction, preschool, introduction, concepts, mathematics, equations, fact families, counting, early, concept, child, care, daycare, pre-k, kindergarten

Rice/Salt "Sand" Art

Someone asked what craft activities could be done with baby food jars. This is a great one for the summer, a beach theme, ocean theme or rainbow theme.


Here's a sneak peak inside my baby food jar bin. We are STOCKED! This heavy bin is holding a gate up on one side, so I couldn't get it any wider. I have a few hundred in there, generously donated by my friend Kimber.


Sand is not friendly to my vacuum or plumbing, so we try to do that OUTSIDE. Plus, the pretty, very fine, CLEAN and sanitized white sand that holds color well that I would like for these types of projects, is VERY expensive at the pet store/aquarium shop. So instead, we use rice or salt.
I had a variety of rice and salt already colored, so I decided to use up what we all ready had available.


The salt is very uniform in size. To make it look more like sand, you can add Kosher or other larger grain salt to the finer stuff  for a greater variety to the texture.


The rice I place into my coffee/spice grinder...


Give it a whirl with a few shakes...and it comes out multi-textured and multi-shaded in color.


I set out the colored rice and salt in small containers.


They were given the sticker box to decorate their baby food jars on the outside.


Then they filled their jars using baby formula scoops, which are the perfect size. For this and a lot of things.


They LOVED this activity and were VERY proud of the results.


Since they are glass, I asked the parents to be observant of how they were handled by the children. I also did not have time to seal the lids on with hot glue or super glue, so that was left to the parents as well.

I went to Miss B's 5 yo birthday party last weekend and mom had them sitting in the kitchen window, a pretty rainbow against the sky.


Since this was a spur of the moment craft,
to have pics to show someone, I went back and spray painted the lids with a spray paint for metal. The red I had was clogged, so they got black and hammered silver. Normal paint will not stick to these slick lids, it needs to be for metal.
Tags: rice, salt, sand, art, craft, layered, layers, preschool, pre-k, child, care, daycare, child, children's, rainbow, beach, ocean, theme, unit, summer, fine motor, color, colors,

Tuesday, June 4, 2013

Lavender Play Dough


Today I made some lavender play dough. I used my usual play dough recipe:
  • 2 1/2 Cups Flour
  • 1/2 Cup Salt
  • 1 Packet Koolaid (unsweetened)
  • 1 Teaspoon Cream of Tartar
MIX dry ingredients well then add wet:
  • 1 Cup Boiling Water
  • 3 Tablespoons Oil
Stir together, let cool enough to handle, then knead until elastic. Add additional flour as needed if too sticky. Usually, this recipe doesn't need additional flour. Click on the link above for a printable recipe.

I used 1 packet each of lemonade and grape Koolaid to get the lavender color. The Koolaid doesn't add as much scent as it does color.

I then used my spice grinder to grind up 2 tablespoons of dried lavender flowers and added those to scent it as lavender. I don't like using lavender essential oil, as it can be a major skin irritant.* The flowers add the same scent without the intensity of the concentrated oils and potential allergic reactions.

I also provided dried lavender flowers for the children to add in to the play dough or play with as they chose.

I was surprised that they played with this play dough for the longest time as is, without getting a lot of toys out of our play dough bin. They just LOVED the smell of it and the sensory of the dough and dried lavender flowers.


*Note: Not all essential oils have irritation issues. Lavender and cinnamon essential oils are the most common to cause allergic reactions and skin irritations.

Tags: play doh, play dough, playdough, homemade playdoh, homemade, play, dough, doh, lavender, dried, flowers, art, sensory, sculpture, craft, fine motor, creative, expression, lavender playdough

Kandinsky Balloon Painting


Kandinksy is a wonderful artist to introduce to the preschool set. His use of bright colors, wonderful color combinations and shapes is both visually and perceptually delightful.


On our art room wall, we have


Color Study of Squares - Kandinsky    


and  Rhythm Joie de Vivre - Delaunay.

We discussed Kandinsky as a person and artist and compared his work to that of Delaunay. This art lesson went over well with the almost 5 year old. The 3s just saw balloons and were impatient to get started.


They first chose their paper. White, color, big, little...


Next we did color mixing. I laid out the plastic lids we used as paint pallets, and added the red, yellow and blue to each one. Then the children placed the appropriate color of balloon on the primary pallets.  We discussed the other balloons and why there were two colors on those. I gave each a balloon and they used the balloon to mix the paint to form that color. 


We do paint mixing frequently, so they were pretty on it as to what primary color combinations made which secondary color. 


Once the colors were all mixed, they were lined up for painting. We reviewed them in English, for the 1-2s, who were doing brush painting at the time, and in Spanish.


The almost 5 year old, got the idea, and did a wonderful job of painting a representation of Kandinsky, though she knew she didn't HAVE to do so.


The 3s and 4 year old LOVED the process and did some interesting work by dragging the balloons, pouncing them around, and smooshing them.


I was surprised at how well this art activity went over. I would definitely give it a 5 star rating for preschoolers. 


One of our favorite books on color mixing, that I highly recommend:


Our favorite video for color mixing is OK Go's Sesame Street video:


Thumbnail


This craft would also be good for children with sensory issues that do not like to get paint on themselves. The knot makes it easy for the children to hold it at the top and still be able to utilize it as a painting tool, but even if they have two hands on and are smooshing it down, they get very little paint on themselves unless they are trying to do so or are over zealous.

The task of getting the balloon to do what they wanted was an interesting study. It wasn't as easy as they thought it would be and took some experimentation and manipulation. I had purposefully tried to make the balloons not be EXACTLY the same size so that they would have the sensory experience of manipulating each one in a slightly different manner.


SKILLS:


  • Creative expression
  • Sensory
  • Fine motor
  • Gross motor
  • Unusual media
  • Color matching
  • Color identification
  • Color mixing
  • Art lesson
  • Color words, Spanish
  • Logic/Reasoning


Tags: preschool, pre-k, art, lesson, Kandinsky, Delaunay, balloon, painting, color, colors, balloon painting, child, care, daycare, history, fine motor, sensory, play, circle,