Showing posts with label Craft. Show all posts

Tuesday, December 20, 2016

Silhouette Christmas Ornaments

Shrinky Dink silhouette Christmas ornaments craft

While the children will be making various handprint and crafty items this week before Christmas, I wanted to do something for the parents that would be a lasting memento. 

Silhouettes are back in fashion, and I thought that would be a great idea to start with.

For the process:

I already had a pack of Shrinky Dink film. 


I took profile pics of the kiddos.

Knowing that my film is 8 1/2 X 11 inches, I manipulated the pics in my word processing drawing feature to comfortably fit within a 1/4 page space with enough extra for the hole at the top and the frame at the bottom.


I printed out the pics, placed them under the Shrinky Dink film, and outlined with a black Sharpie marker. [Don't scrimp and use a low-end marker.] I then removed the film from atop the photo on to a piece of plain white paper.

I took an oval piece from one of the children's shape matching games and used it as a template at the bottom to make a frame for their name and the year. I free handed the inside line about 1/4 inch.

I wrote their name and the year into the frame. I liked the satin look for the front of the ornament. If you want the shiny look for the front, I would print out the name and year in mirror and copy onto the ornament. 


I colored in the profile outline and the frame with a broad tip permanent marker going in one direction. If you go back and forth then it will start pulling the ink and make a gummy mess. Make a clean, slightly overlapping line and leave it to dry.

Once the first layer is dry, do a second layer of black permanent marker in the opposite direction. It will give a linen-like look to the finished piece. 

If necessary, let dry and do a third coat. Just because it shrinks down dramatically, doesn't mean that any missed or thin ink spots won't show. Get a good coverage before shrinking.

Use a standard hole punch to punch a string/hanger hole at the top of the film.

Bake at 325 degrees. I won't give a time, just to say it takes a couple of minutes. You need to watch them carefully and once they are FULLY flat, count 30 seconds and remove to cool. I was fearful the entire time watching them as they curl and bubble up and look like a freakish mess and that there is no way possible that they could end up flat and looking decent. They do! Just let them do their thing.

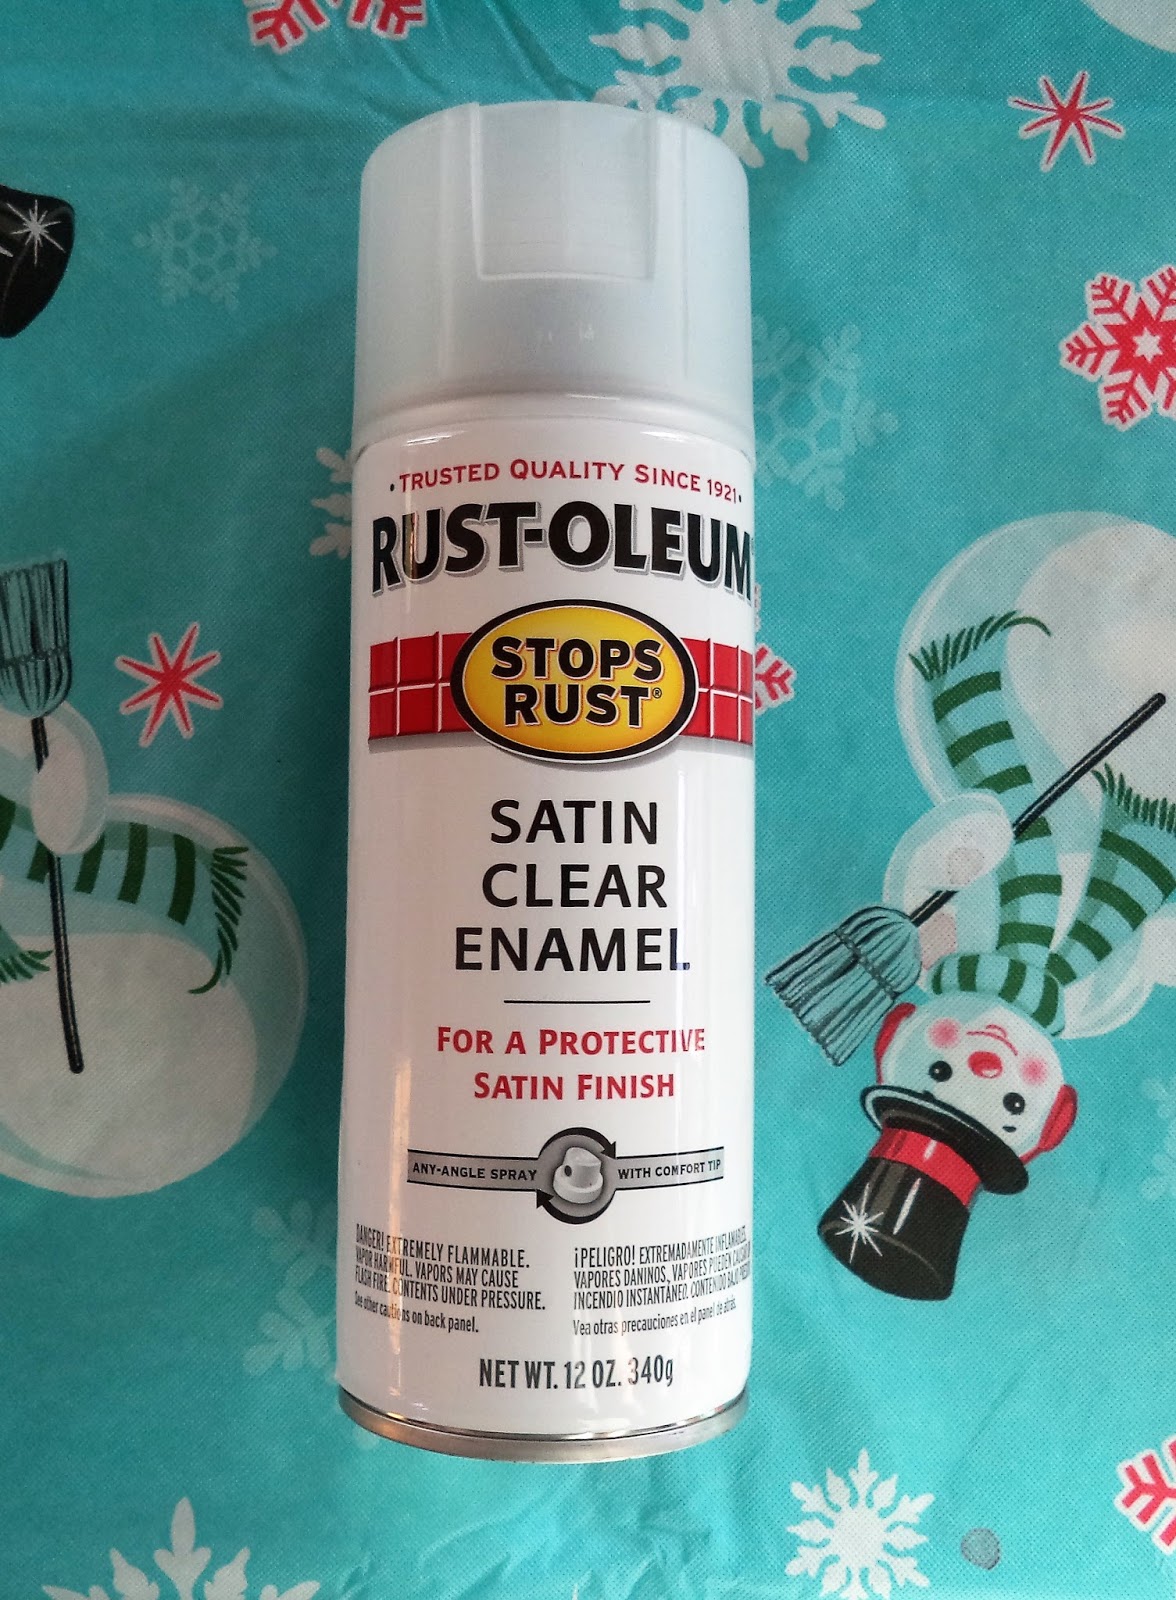
Once thoroughly cooled, I sprayed the inked side with a satin enamel. You could also use Modge Podge or another sealer, but I wanted something I could spray so that it wouldn't possibly mess up the pic with brushing something on.


I had some cording that fit perfectly through the hole. 


shrinky dink silhouette Christmas ornaments

They turn out relatively small. The shrinkage rate on my Shrinky Dink paper is suppose to be 50%, but they seem really small for a 1/4 sheet. They went from 4 1/4 X 5 1/2 to 1 5/8 X 2 inches.

I really like them. I hope the parents do, too.

cd3b5a1cfca0f056eb22a99c7b76c7bf2fd26004c317632a6f

Tuesday, December 23, 2014

Christmas Activities and Crafts


Here are a few of the activities and crafts we did this Christmas season.

SNOWBALL TOSS & GRAPH

Using our bins from the block area, I made up the point value numbers, laminated them, and used packing tape to put them on the buckets. The first day worked counting by fives and multiples of fives for the bigs, and number recognition of 5 units for the littles. We changed it up on other days for 2's and 10's. 

Skills: Hand-eye coordination, taking turns, following directions, spatial awareness, number recognition, multiples, graphing, interpreting a graph, ordinal count


CHRISTMAS TREE ORNAMENTS

These are darling keepsakes. I used hotglue for the popsicle sticks. They chose their color and added the gems. I cut out their pictures and added them to a background of scrapbooking paper. The date is simply written on with a fine Sharpie. They used a brown marker to color in the popsicle piece for the truck if they wished.


REINDEER CRAFT

More product than process, but it's really cute. Traced a handprint on folded brown construction paper and cut out. Bigs could do their own cutting. 

Cut two triangles from a sheet of brown construction paper by marking the long sides into thirds and using 2/3 of each side as the bottom of the reindeer. They folded over the top of the triangle, and added the eyes and nose. The bigs could have pom pom noses if they wanted. The big girls wanted to make Clarise, so of course that meant a BLACK nose and bow. The littles I let use the google eyes, but not the pom poms, simply because I know what works and doesn't with them. Pom poms would not work.


Big Miss H asked if she could make her reindeer into a mask. Huh. SURE! Miss A also thought that was a wonderful idea.


REINDEER SANDWICHES and KIWI ORNAMENTS

Yeah, it might be a stretch on the ornament piece, but they bought it. I just used a large heart cookie cutter to cut out the sandwiches for breakfast.


SUGAR CONE CHRISTMAS TREES

Thinned down frosting in squirt bottles, M&M's, sprinkles, and candies. Only the big kids got to do this. They had fun, but it was MESSSSSSYYYYYYY! Eating them was a whole 'nother problem. Most of it got thrown away. I do not recommend this activity for anything other than using them on a gingerbread house display.


JINGLE BELL DANCING

One of those super simple, surprisingly amazing activities. The all LOVED this one. Just jingle bells in a container of water with a strong magnet wand to move them around. Note that the jingle bells were rusting pretty good after a few weeks in the water, but the use they got out of it was worth it.


SNOWMAN PANCAKES

Okay, so this was my first effort at pancake art, so give me a break. The kiddos loved them and thought I did a great job.


And of course, check out the posts on our Christmas Dramatic Play Area,


and our Christmas Sensory Bin from this year.

Tags: child care, daycare, kindergarten, preschool, pre-k, craft, activity, math, Christmas, holiday, season, theme, unit, homeschool, homeschooling, education

Tuesday, May 6, 2014

Collaborative Collage


It is the last cold, wet, dreary day before the spring-like weather will arrive for good. [fingers crossed!] They were going insane, bouncing off the walls, so I got this project started.


I had a picture that I didn't like, and haven't been able to sell, because evidently no one else likes it either. It's just been sitting around taking up space before heading to the thrift store donation bin. 


Then I had an orange gumball moment, inside joke, it's kinda like, EUREKA! 


We had played with sticky walls before, 


so this isn't really NEW, but this time they could really go to town and have a finished, displayable art piece at the end.


I used spray adhesive to adhere contact paper to the glass then let it set for a couple minutes before peeling the backer off.

It left us with a stick surface to do collage work upon.


They had free use of anything in the cutting bin, like tissue paper, straws, yarn, foil, fabric, wallpaper, scrapbooking paper, magazine sheets, etc. 

I cut a few strips of construction paper and curled and folded them, then just left them out on the table for them to use as they saw fit. 


We had a small container of lids I gave them, and then I raided the supply drawers and pulled out a few pom poms, packing peanuts, cotton balls, etc. that I just tossed on the table.

They spent over an hour working on this, and there was never any contention.

I think it came out looking really amazing. I placed it above their coat racks in the entry area.


This way, they and their parents and any visitors can get a taste of their awesomeness. 
Tags: art, preschool, child, care, daycare, kindergarten, craft, cutting, paste, collage, picture, fine motor, collaborative, glue, sticky, contact paper

Thursday, April 17, 2014

Easter Bunny Sack Puppets


The older ones were able to use google eyes and a pom pom for the nose. If we had more time, they would have traced and cut out their own pieces, but since we did that yesterday, and I didn't have templates ready, I just cut everything so they could assemble. 


The little ones used circles for the nose and eyes and added a white dot to each eye that I punched with the hole punch.


If you want to create a bunch of pieces for a group, you can get 8 ears out of one sheet of construction paper if folded in half short side to short side, then folded in twice.

Since I was wishing I had templates pre-made, I went ahead and made one. Then I thought about large groups and elementary kiddos who could make these in class if it was a coloring/cut/paste sheet, so here it is...

This one also wouldn't have any choking hazards for the under-3 crowd and wouldn't have items falling off, as much, in backpacks.


My inspiration for these came from a craft share site where Karolina Slater owner of DayKare posted these cute bunny puppets. I gave my children the option of putting the cotton balls on as paws and adding one to the back for a tail, but they chose not to.  


Follow Connie -'s board Easter Theme on Pinterest.
Tags: Easter, chick, chicken, bunny, rabbit, craft, cut, paste, color, coloring, puppet, glue, preschool, pre-k, kindergarten, elementary, spring, farm, nature, kid, kid's, paper, bag, paper bag, paper sack, sack

Wednesday, April 16, 2014

Duck / Bunny Easter Preschool Puppet Craft


We also made these darling ducky/bunnies.


I looked at several printables for these, and this one, FREE from Kay Sommer on TPT, I felt was not only the best of the lot, but that I couldn't create one any better. 


I did, however, resize them to fit on a single sheet of paper. You could simply change your printer settings to print 2 pages on 1 sheet landscape.


The poems read: 

"My little duck is really funny, turn him over and he is a bunny."                        "My little bunny brings me luck, I turn him over and he is a duck."

The older children could read these through fine. A lot of their sight words are included, which I loved.


These were surprisingly successful. 


The older children did a remarkable job of coloring in the lines and cutting out their own. They were also able to add a yellow feather for the duck's wing and a cotton ball for the bunny's tail. the little ones didn't get those choking hazards.

We did several rounds of "5 Little Ducks" as a puppet show. It works out great since we have 6 students here. Five ducks and one momma. Everyone had to have a turn playing momma.


They randomly played with them throughout the day, and I hear at home as well.
Tags: Easter, chick, chicken, bunny, rabbit, craft, cut, paste, color, coloring, puppet, glue, preschool, pre-k, kindergarten, elementary, spring, farm, nature, kid, kid's, 

Chicks Hand Print Preschool Easter Craft


This ended up being a DARLING craft project, and I loved that it had so many different elements.

It was also easy to differentiate for the older and little ones. For instance, the 4s had the option of tracing and cutting out their own circles. They also were allowed to use google eyes, and the littles used fingertip prints.


We started out with 1 sheet of white construction paper and 1/2 sheet of yellow.


I found two lids that would fit appropriately on the paper. These were 5 inches and 3 inches.


After gluing down the yellow circles with glue sticks, we did yellow handprints for the wings and orange handprints for the feet.

The older children cut yellow and orange yarn snips about 1 inch long and glued them on with white glue. The little ones helped me cut them with teacher-assist scissors. I helped them place the glue and they laid the yarn pieces down themselves.


While these are cute like this, I felt it needed some more.


So we used some of our crimped paper Easter grass to add to the bottom. They patted it onto a bed of white glue. After it dried, I trimmed the pieces even with the paper.


To make the black eye finger prints on the little one's chick look less soulless, I added in a small circle to each eye with a silver sharpie, since I couldn't find my white-out. 


I found this idea on Pinterest from funhandprintart.com. Other great ideas are available on my Pinterest Easter Theme board.

Tags: Easter, chick, chicken, bunny, rabbit, craft, cut, paste, color, coloring, puppet, glue, preschool, pre-k, kindergarten, elementary, spring, farm, nature, kid, kid's,