Showing posts with label Outside. Show all posts

Wednesday, July 10, 2013

Outside Abacus

If you are following, you know that we are all about early math instruction right now. Since I have an indoor/outdoor learning philosophy, I'm always looking for ways to move learning OUTSIDE. 


I've seen some token outdoor abaci/abacuses, but not any with a full 100 units set up for actual mathematical manipulation. It is a pretty cheap addition to our outdoor classroom. I will be adding a chalkboard to the side of this specifically for writing equations.

While this is a manipulative, self-directed learning activity, and available for play, by the children of every age, since it is an awesome gross and fine motor activity, color learning activity and early counting activity...


Fine and Gross Motor, moving and twirling
it's goal is ultimately to act AS AN ABACUS
Addition, subtraction, multiplication, division.

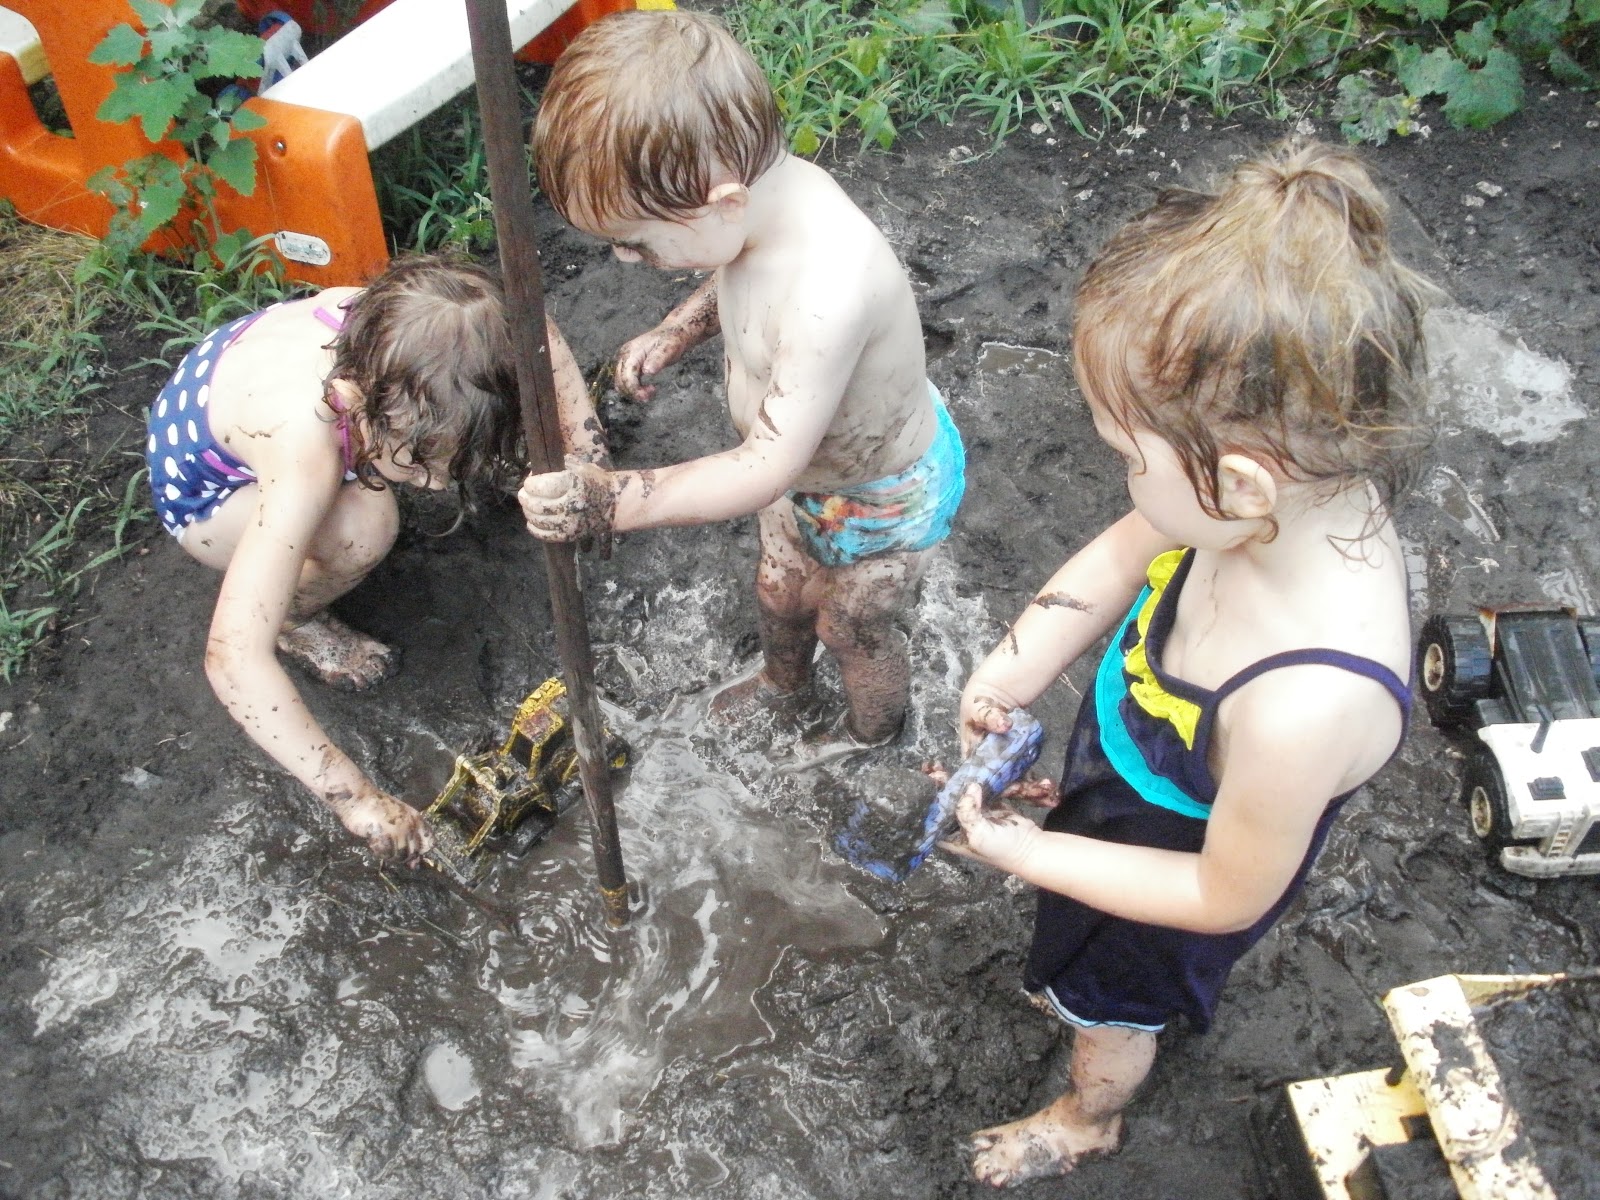
And that's exactly how the preschoolers chose to immediately use it. Although, they have had previous experience with our classroom abacus, so it was an easy transition.


Counting by 5's

I found a post from Happy Hooligans, after creating my abacus, in which she used pool noodles for a similar project. Even though my project was not influenced by hers, she still did it first and I acknowledge that. 


HOW TO:
  • Serrated Knife
  • Tape Measure
  • Scissors
  • Lighter
  • $5.00     (5) Pool Noodles                 
  • $2.50     50 Feet 75 Pound Rope 
  • $3.00     (10)  #208 or #210 Eye Hooks   
Total $10.50 

I bought 5 pool noodles at Dollar Tree. These were about 2 1/4 inches wide when the tape measure was pulled tight against them. I went with the smaller diameter noodles to ensure that my young students would have plenty of space to manipulate the pool noodle "beads."


I cut them the same length as their diameter, easily getting the 20 beads out of each pool noodle that I needed. A serrated bread knife easily cuts them.


Since we already have pool noodle "blocks" both inside and outside, these could be dedicated to this purpose. To make them removable, cut a slit through the side.


To ensure the children could easily reach and manipulate the beads, I decided to do 5 lines of 20 across, rather than 10 lines of 10, like a normal abacus. To make the distinction between the two sides, I ensured that the colors of the noodles were offset. 


I had the child with the average height raise her arms to determine the best height for the top string. For my students, that was 43 inches.


Since the noodles are 2 1/4 inches wide, I made the distance between the strings 6 inches.


I inserted the ten #208 screw eyes into the middle of each fence post, starting from the top measurement of 43 inches up from the ground. #210 eye screws are probably strong enough for most applications. I went a little heavier since I want this to last for years.


Since my ground was uneven, but my fence was level, for the second post I measured DOWN the same distance as the first post to where I had placed the top eye hook to ensure the string lines would be level. You could also just put a string level on it. 

If the string isn't level, it will be more difficult for the children to manipulate the blocks, and they may constantly slide to one side. If you are just having this for play it may not be so important, but for use as an abacus, level is necessary.


I bought 50 feet of 75 lb twisted poly rope from Walmart. It came in different colors. I used around 42 feet for this project: (5) 8 foot lengths, (4) 5" risers, plus tie off lengths.

I tied it off on the top left eye, threaded 10 each of two colors onto the string, wove the loose end through the opposite eye front to back, down and through the next eye down back to front, then repeated threading on 10 each of two colors of noodle beads, continuing until I reached the last eye. I cut the rope, tied it off, leaving a tail about 4 inches long, in case I need to untie it for tightening later, and sealed the end of the rope with an aim-a-flame/lighter.


Threading it produces much tighter string lines over all than doing them individually, which is important. The children are NOT nice with these. They pull on the lines, hang on them, etc., so it was very important that they be as taught as possible to begin with.


Wire could be used, but up against a fence I needed to ensure that the lines were not SO secure and tight that they could be used for climbing. These are not. Not that I don't have some monkeys, but there's just no way they can even get a foot hold on the thin line.


I purposefully used 10 of 2 different colors on each line so that the units of 10 were very apparent for skip counting by 10s. Also, when doing addition on each line, they can easily differentiate the two sides of their equation, and easily subtract one portion away for cross-learning.


These are a great visual and manipulative for skip counting.

Mr. G: "Nine and one is TEN!"
Me: "Yep, and if you slide the blue ones over, that's another TEN, and then you'll have ten plus ten which is TWENTY!"
Mr.G: [sliding the blue ones over then counting 1-20, looks up at me with wonder] "You are REALLY good at this game!"
Me: [laughing] "I've had a LOT of practice, buddy."
Tags: outdoor, outside, abacus, math, pool noodle, bead, manipulative, play, playground, preschool, pre-k, kindergarten, outdoor abacus, outside abacus, environment, gross motor, fine motor, toddler, 

Friday, May 10, 2013

Garden Totems


Saw these amazing garden totems on Pinterest, that I loved! Unfortunately, the link takes you to a Tumbler account that makes it nearly impossible to find the photo again, and there is no source information. 


Although the pin comment says "plastic and metal lids, the original looks to me to be made out of cut wood pieces. There are too many different shapes, they fit together too well, and the colors are the same for very different shapes and sizes of layers, leading me to believe they were painted, not found. If you are making a permanent sculpture, that may be an option if your woodworking capabilities are up to it.

For us, though, cheap and easy is how we fly. I think this one came out VERY similar in overall idea.


I've been having my clients, family and friends collect lids for me for almost a year. Not for this project, but for something else entirely. Now I need a few hundred more for several projects. 

SUPPLIES:

Block of wood to drill atop
3/8 inch spade bit
Adjustable pliers large enough to hold caps
5/16 inch diameter 4 foot long zinc coated steel rod

I had everything else, and purchased the rod at Home Depot


While using my Dad's drill press would have been NICE, it's buried somewhere in one of their outbuildings. Not wanting to pay $1400 for one, I thought this would work JUST FINE. And it did.


Many of the lids have a center point that is apparent due to the manufacturing process. Those that didn't, I just guessed. The spade bit has a sharp point, so it's easy to get it set in the plastic. I found that going slower was better. It left a cleaner edge. Going too fast caused the plastic to tear up and not cut off cleanly. For those I took a utility knife and cleaned the edges up.


When done, I had a basket full of items and some plastic confetti to clean up. It took less than half an hour to do all these. That may be stretching it pretty far. We were hanging outside and I had other things going on and didn't time it. Enough to say it didn't take long at all.

With the rod being 1/16" smaller than the holes, the children are capable of easily taking the items on and off the rod. The rod is high enough not to take an eye out, but low enough that the 3 year olds can all reach well enough to get the items on and off.

We used found lids, but I also added in:

  • Mustard bottle
  • Ball pit balls
  • Mega blocks
  • Bottle nipple caps
  • Plastic cups and plates 
  • Used bubble bottle
I'm now on the look out for any type of lid or container with an interesting shape or color. We have enough to do another one, and I plan on having 3 in the garden once the garden is set up properly. Since this is an interactive children's garden, they can freely take the totems apart and put them back together in an endless variety of compositions. 


My client, Jen, who has been my secondary source of lids and is amazingly creative and smart, was the one who mentioned leaving some of the drink lids un-drilled and using the straw holes instead so that they would sit off-set. We did that. They fit on the rod perfectly. The children mentioned that it looks like a flower where we did those. It adds a great additional dimension to the totem.


The children LOVE this activity. Of course, it's new, but since it will end up different every single time they play with it, I think it will end up being a great addition to our outdoor play space. They like taking them off just as much as putting them on.

SKILLS:
  • Fine motor
  • Gross motor
  • Artistic expression
  • Geometry
  • Spatial relations
  • Symmetry
 Tags: outdoor, play, playground, garden, preschool, pre-k, child, care, daycare, gardening, art, craft, totem, plastic, lid, lids, sculpture, artistic, create, fine motor, skills, child, children,

Thursday, October 4, 2012

Red Rover Tag with a Teaching Twist


The preschoolers 2 1/2-3, started playing RED ROVER with me this morning. Another simple game that has AMAZING learning potential. [Skills listed at end of post.] I came up with this about 8 years ago. We play it differently, more like tag...less aggressive, no intentional contact between children, with a LOT OF FUN AND LEARNING!!

I usually get tired of the game long before they do and it is a great tool for reinforcing learning concepts, some very subtle, that the children are unaware they are even learning, but I do.

Usually we have bigger kids for the younger ones to learn this game from, but that hasn't been the case for a while. Plus, you really need a GROUP, i.e. three or more children who are old enough, to play. So this was all new to this bunch of kiddos.


They line up and I call out misc. things like, "
RED ROVER, RED ROVER, send people wearing GREEN right over!" and the children all have to run around me and back to the line while I try to tag them. Some of the call outs I used today: girls, boys, who ever has brown hair, someone who's name starts with an H/A/G, who is 3, who has their jacket zipped up.

For the green, Miss A had to look to the leaves on a flower on her jacket and Miss H to a few sequins on her shirt. It was a good lesson in attention to detail. I just kept giving them hints until they found it. Then they ran.
 
Often, they WANT to be tagged. I'll scoop them up and whirl them around before letting them run off squealing and giggling. 

1-2 YEARS OLD
The children have to be old enough to be able to have some deductive reasoning and observation skills before they can play in relation to the call outs. In a mixed age group, the younger ones just run with the big kids. However, they are still learning. They learn to:
  • wait until I say OVER to run 
  • to run back to the starting point 
  • to go around me left to right [they always go around me left to right to work that convention!]
  • to elude me 
  • to evaluate space so as not to get run over by the bigger ones 
  • gross motor/coordinated movement 
2-3 YEARS OLD
Sample call outs for early preschoolers.
  • color on outfit 
  • type of shoe such as sandal or tennis shoe 
  • zipped or unzipped jacket 
  • have buttons on their clothes 
  • have something in their hair [barrettes, ties] 
  • color of hair 
  • boy/girl 
  • first letter of name 
  • like [ice cream, cookies, candy, pizza] 
  • have a pet named [Otis] 
  • are [age] 
  • short hair/long hair 

4-5 YEARS OLD

 As the children get older, I increase the level of difficulty of the call outs. 

  • advanced colors such as gold, turquoise on clothing 
  • ending letter of [first or last] name 
  • whose first name has [4] letters 
  • [first or last] name that rhymes with [sad] 
  • [first or last] name that starts with same letter as [cat] 
  • has a mother/father named [Steve] 
  • is the same age as [6-1] 
  • has [brown] eyes 
  • whose favorite color is [purple] 
  • who lives in a [white] house 
  • whose mommy drives a [red] car 
  • who is the [oldest/only/youngest] child in their family 
  • who has [two sisters] 
Yep! The grass SO needs cut!


HIGHER THINKING

I also call out some random "thinking" questions such as "RED ROVER, RED ROVER send people with TWO BELLY BUTTONS right OVER!" three ears, no brain, two left feet, etc. You can just see the little minds working furiously, most likely contemplating such things as counting their own belly button(s), wondering if the person next to them has two, if ANYONE has two, is it POSSIBLE to have two? Half the time someone will just run for the heck of it and I have to send them back and we have the discussion. If no one runs, then we still discuss.

I also call out easy ones such as people who like ICE CREAM. Of course everyone runs! But then I will also call out something like, people who like BROCCOLI. Again, you can see their little minds working furiously over such questions as, DO I like broccoli? Kinda. Do I like it enough to qualify to run? Hmmmmm. So they begin to quantify their level of liking to assess if, in their own mind, it qualifies. Some pretty advanced thinking for little ones, and self contemplation, courtesy of a very simple, fun game.

We will also do the same thing, only I will call out animals. "RED ROVER, RED ROVER, send BUNNIES right OVER!" and they all hop over and around me, again trying to elude me, and I'm the same animal, or a predator, for example sheep and wolf. We establish that prior to call out. In advanced play, I will occasionally call out an animal good at camoflouge and say that I can't see them, they blend into the grass. This usually gets a lot of giggles. Especially when I say, "I hope they don't get on me [grab me, pull my hand, etc.], because I can't see them! Their camoflouge is TOO GOOD!" Yep, you can image what happens after that!

I try to make certain that the children get an equal amount of runs in, and that no one is left waiting for more than two turns. But I also want them to learn to be patient and wait until they KNOW their run is legitimate to them. I AM wearing the color green. I DO have two sisters, My dad's name IS Steve. I DO have a dog named Otis. I LOVE broccoli!

This is kind of our outside group circle time. We will begin to do this when we first go outside every day, varying the skill sets and questions, increasing the difficult or tailoring it to specific themes and lesson objectives.

SKILLS: 
Social: listening, patience, focus, cooperation, following directions, truthfulness, ability to discuss and defend choices and decisions
Math: numbers, counting, logic/reasoning, deduction, shapes, math concepts, sizes
Literacy:  left/right convention [the direction they go around me, always!], letters, sounds, vocabulary
Science: anatomy, deduction
Art: colors, shapes
Gross Motor: sense of space as they try to either elude me or get tagged in a running group, coordinated movement, direction
Identity: sense of self, sense of body, likes/dislikes, personal information, conviction, self-confidence
Multicultural: understanding and acceptance of differences between themselves and their friends
Tags: recess, tag, red rover, red, rover, learning, teaching, kid, kids, group, play, social, emotional, body, skill, children, boy, girl, run, running, following directions, logic, reasoning, deductive reasoning, gross motor, game, preschool, child, care, childcare, daycare, outdoor, outside

Wednesday, August 8, 2012

A Little Loose Parts Play


"Look, Miss Connie, I made an A for ME!"

Almost 28 months, playing with loose parts in the construction zone. Totally independent activity. I've never done this with them. We are just starting on letter identification and formation. I had to grab the camera.


"Well, I can make an H for me, too!" 
Yep.


"Well, I can sit on a circle!" 
It's a little harder to make a G with loose parts.


Today's big thing, besides making letters with our few left-over PVC pieces, was holding them up to our eyes and spying out as pirates. There were a lot of "Aaaargh!"s going on. Even little L got in on it.


We took advantage of the overcast morning and played outside until lunch. Love these kind of days.

Friday, June 29, 2012

International Mud Day Celebration

In celebration of International Mud Day, we got messy!

The construction pit was transformed with a little help from the hose. It went from this...


 To THIS...


We also played on our water pillow.


There was a lot of hopping,


flopping,


rolling, and laying. 


A wonderful sensory morning on a hot summer day.

To make the water pillow: 
  • Double over heavy duty plastic sheeting to twice the finished size you want 
  • Fold in half to finished size
  • Fold over edges twice and duct tape [use heavy duty tape] down as you go 
  • Leave one corner open for filling
  • Check seal of tape, securing firmly all the way around
  • Add a second tape layer, overlapping first by at least 1/2 inch, as needed
  • Place about 6 drops of green and 6 drops of blue food coloring into the hole
  • Fill  to desired depth, 1-2 inches
  • Double fold opening and seal with tape
Tags: water, play, sensory, mud, international mud day, june 29, outdoor, pillow, mattress, plastic, sheeting, childcare, child, care, daycare, preschool, fun

Thursday, May 3, 2012

Nature Walk

The children are lucky that I don't have the time, money or inclination to have a perfectly manicured yard. About once a week we'll take a group perusal of the sights, smells, sounds, textures and tastes to be had. This is a single morning spent in our outdoor classroom.

PLANT LESSONS
We just started a gardening unit and have been discussing plant life cycles, plant needs and plant parts. We first pulled one of our radishes and discussed the different plant parts and how we eat the radish root, but the lettuce leaf, the pea seed, the celery stalk and the broccoli flower.

We located dandelions and discussed the differences between a bud, a flower, a seed head and an empty seed head. We looked at the seed to see that the fluff was not actually part of the seed. We blew the seed heads, and watched the seeds fly as we had read about. We watched how far they would fly.

Next we found some maple tree seeds and threw them in the air to watch them helicopter down and discussed that these were ALSO seeds made to fly. We took a walk and carefully watched for maple seeds to spy which one had landed the farthest from the tree. Then we walked back to the tree counting how many of my steps away that was. Twenty-four. If the children had been older, I would have let them count their own steps and also counted mine by two's because I have a two foot stride.

cherry tree
We also checked out all the fruit trees and discussed how the fruit holds the seeds inside. They remembered just a few weeks ago when they were in full bloom. Here we discussed the differences between a tree, bush, plant and vine and how different foods grow on different types.
pear trees
We have these along with apple, peach, plum and apricot trees.

SENSORY EXPLORATION
Smelling and tasting the oregano before hitting the lemon balm next to it. 
We also tried the clover today.
Checking out the thorns, soft petals and subtle scent.
Buds versus blooms versus spent blooms.
The thorns on the roses versus the thorns on the berry plants.
[Why do plants have thorns?]
Always a favorite...the fuzzy plant...lamb's ear.
"It's SO soft!"

I have several different peonies around, and each has a slightly different scent. It's a great experience for them to rapidly flit between them and assess the differences. Peonies are wonderful for showing the stamens and pistils and how the ants work to pollinate them, rather than bees, as they gather nectar. 
[Why do plants smell?]

This baby evergreen was soft enough to touch, but still prickly. We compared it's size to the medium one in the middle of the yard and the big one at the side. [Why are some plants prickly?]

BUG SCIENCE
We spied a white butterfly, we also found a monarch. 
[Why did the butterfly land on the flower?]
When we found the butterflies, we just had to fly like butterflies. 

On the back of the property B spied this leaf with a red dot. She thought it was a lady bug. We found out it was an insect egg...and there were a LOT more of them on a taller maple sapling behind it. This gave rise to discussion of insect life cycles, a review of some of our just finished egg unit points, and a brainstorming on what kind of insect they could be from, since we didn't see any nearby. [Why are the eggs stuck to the leaf?]

We have a couple of boards that we term the "bug boards." We regularly turn them over to see what is there. It's a race to see what all we can see before many of them disappear. The spiders head off first. LUCKILY. If not, I encourage them along with a stick after the children get a view. Today there was only one small brown one. We also saw a couple small black milliipedes, a larger brown centipede, snail, slugs and lots of pill bugs [rollie pollies]. [Why do the bugs live under the boards?]

The 11-year-old likes playing with slugs, he just hates the hassle of getting the slime off afterward. It really sticks. He named this one Darrin. [Why do slugs make slime?]


Doesn't she look sweet feeling the peony? You can't tell from this pic how filthy she is. Muddy tiger stripes on each cheek, muddy feet, muddy dress. 
PROOF...It was a great day!

Posted to the Outdoor Link Up

Tags: nature, nature study, preschool, prek, pre-k, toddler, senses, backyard, exploration, bugs, bug, science, plant, plants, herbs, flowers, childcare, daycare, sensory, outdoor